This section discusses configuring PaperCut MF on a Veritas Cluster Server (VCS). The section provides a brief overview and is designed to supplement guidance from the PaperCut MF development team. If you are about to commence a production deployment on VCS, please feel free to get in touch with the development team for further assistance if required.
Note that Mode 1 only is supported for deploying on VCS.
This section assumes that you have an already installed and working clustered printing environment.
The PaperCut Print Provider is the component that integrates with the
Print Spooler service and provides information about the print events to the
PaperCut Application Server. At a minimum, in a cluster environment, the
PaperCut Print Provider component needs to be included and managed within
the cluster group. The PaperCut Application Server component (The
Standard installation (primary server) option in the installer) is set up on an
external server outside the cluster. Each node in the cluster is configured to report back to the single
application server using XML web services over TCP/IP.
PaperCut MF supports both Active/Passive and virtual Active/Active in VCS. This section discusses configurating PaperCut MF on a single virtual server running Active/Passive. If your organization hosts mutliple virtual servers, jump to the following section covering Active/Active.
First, set up and verify that the cluster and print server is working as expected. The system should be fully configured and tested before proceeding to the next step and installing PaperCut MF.
Install the PaperCut Application Server component
(Standard installation option) on your nominated system. This system will
be responsible for providing PaperCut MF's web based interface and storing data. In most
cases this system will not host any printers and is dedicated to the role of hosting the
PaperCut Application Server. It may be one of the nodes in the
cluster; however a separate system outside the cluster is generally recommended. An existing
domain controller, member server or file server will suffice.
The Print Provider component needs to be installed separately on each node involved in the print spooler cluster. This is done by selecting the Secondary Print Server option in the installer. Follow the secondary server set up notes as detailed in Chapter 15, Configuring Secondary Print Servers and Locally Attached Printers. Take care to define the correct name or IP address of the nominated application server set up in step 1.
By default the PaperCut Print Provider component will associate itself with the physical node. A configuration
change is required to force it to bind to the virtual server. Add the following lines (or uncomment the
example lines) to the file:
C:\Program Files\PaperCut MF\providers\print\win\print-provider.conf
ServerName=[VIRTUAL SERVER NAME]
PrintServerName=\\[VIRTUAL SERVER NAME]
Where [VIRTUAL SERVER NAME] is the network name associated with your virtual server. Note that
the PrintServerName must be prefixed with two back-slashes (\\). The first
setting is used to override the name reported to the PaperCut MF Application Server. The
PrintServerName setting instructs the print provider to search for printers on the virtual
server rather than on the physical server.
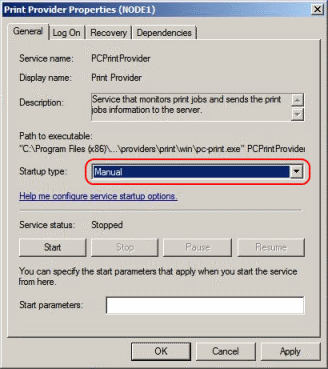
By default the Print Provider component is installed under the management of the node.
To hand over management to the cluster, the service start-up type needs to be set to manual. On
each node navigate to
→ →
and locate the PaperCut Print Provider service.
Stop the service and set the start-up type to Manual.
Repeat for each node in the cluster.
The PaperCut Print Provider service needs to be added to the
Veritas Cluster group associated with the virtual server. This is to ensure that the service is
managed within the same group as the print server and will fail-over as part of the group.
Create a new GenericServer resource called
PaperCutPrintProvider01. Set the service name to
PCPrintProvider. The account, password and domain can be left as defaults.
The PCPrintProvider service must start after the print spool resource.
Create a dependency link between PaperCutPrintProvider01 and the
PrintSpooler using the tools on the Veritas Cluster Resources tab associated
with this virtual server.
On large networks it is common to distribute load by hosting print spooler services under two or more virtual servers. For example, two virtual servers may each host half of the organization's printers and hence share the load. This is sometimes referred to as Active/Active clustering - albeit not an entirely correct term, as the print spooler is still running in Active/Passive.
Virtual servers cannot share the same service on any given node. For this reason if the virtual
servers share nodes, you'll need to manually install the
PaperCut Print Provider service a second time under a different name.
Use the following procedure.
Set up one virtual server using all steps in the preceding section. After this virtual server is tested, perform the steps below to set up the 2nd virtual server.
A 2nd copy of the PaperCut Print Provider needs to be created on
each physical node. This is required so that a separate service can be installed and configured
to bind to the 2nd virtual server. Copy the following directory, and all its contents:
C:\Program Files\PaperCut MF\providers\print to
C:\Program Files\PaperCut MF\providers\print2. Repeat this step on both
physical nodes.
Add the following lines (or uncomment the example lines) to the file at
C:\Program Files\PaperCut MF\providers\print\win\print-provider.conf:
ServerName=[VIRTUAL SERVER NAME 2]
PrintServerName=\\[VIRTUAL SERVER NAME 2]
Where [VIRTUAL SERVER NAME 2] is the network name associated with your 2nd
virtual server. Note that the PrintServerName must be prefixed with two back-slashes
(\\).
Repeat this step on both physical nodes.
Services need a unique name. We'll install a 2nd instance of the service under the name
PCPrintProvider2. This is done by typing the following commands at the command prompt.
    cd C:\Program Files\PaperCut MF\providers\print2\win
    pc-print.exe PCPrintProvider2 /install
Repeat this step on both physical nodes.
Repeat steps 5 through 8 in the preceding section, this time using the service name
PCPrintProvider2 rather than PCPrintProvider. The recommend
unique name for the cluster resource in step 6 is PaperCutPrintProvider01.
