PaperCut MF is a multi-user application designed to integrate with an authenticated network. The Macintosh system has a long history. It's grown up from a single-user desktop heritage and is now based on a full multi-user Unix kernel. However, some "single-user-isms" remain, and these can pose challenges for Administrators. One area in particular is remote printer configuration and credential management.
When a network printer, for example a shared Windows printer, is added to a Macintosh system, the Printer Setup Utility requests printer access credentials in the form of username and password. Any user that prints to this printer uses these supplied credentials. This means that on the print server, all jobs originating from this Mac system list with supplied username irrespective of who's actually using the Mac.
This chapter discussed some of the multi-user challenges and their solutions.
Macs can be set up to work with PaperCut MF in a number of configurations or scenarios. There is no "one best" set up. The ideal solutions will vary from network to network and will depend on factors like:
Your existing network configuration.
The mix and makeup of operating systems used on the network.
The underlying directory technologies (Active Directory, LDAP, etc.) if used.
Whether Macs are used by a single owner or multiple users.
The following sections outline common set up scenarios and their pros and cons. Your solution may fit one of these scenarios or may be composed of a combination.
Many networks, particularly those in a business environment, have a dedicated desktop system for each user. This allows the desktop system's global settings to be customized for the user. Common examples include:
Dedicated computers used in a business
Staff laptops or desktops used in education
Printers hosted and shared from a Windows or Linux server.
Mac systems used by a single user (or small group of known users).
Each user has a domain account and password.
The username associated with the account on the Mac matches the domain username (either the account used to login, or the account set up as the automatic log in account).
Running Mac OS X 10.3 or higher.
Check the user account information:
Start up the Mac and ensure the system is connected to the network.
From the Apple Menu select System Preferences...
Select Accounts
Click MyAccount.
Ensure that the Short name associated with the account matches the user's domain account username. If not, create a new working account as appropriate.
Set up the printers that the user requires access to:
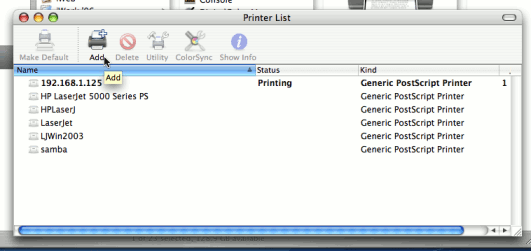
Open the Printer Setup Utility from Applications -> Utilities.
Click the button to add a new printer.
10.6 & 10.5: Control-Click on the Toolbar and select . Drag the icon onto the bar. Click the newly added button.
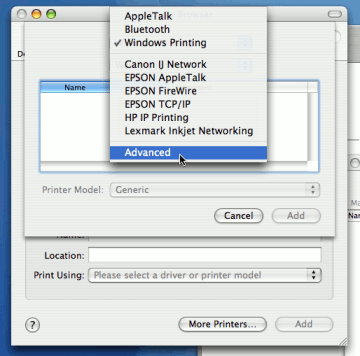
10.4: Option-Click (Important: Hold the Option key down) and select Advanced from the top drop-down list.
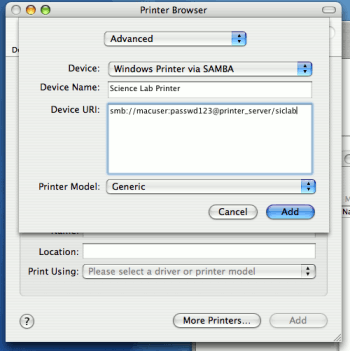
Select the Windows device type (called Windows Printing via Samba on 10.4).
In Name field, enter a friendly and informative printer name.
Enter a Device URL in the form:
smb://username:password@server_name/printer_nameWhere
usernameandpasswordare the user's domain account login details.server_nameis the name of the server hosting the printer, andprinter_nameis the printer's share name. On recent fully patched versions of 10.6 and 10.5 theusername:password@component can be skipped as the OS will instead prompt for the username and password on first print. Note that OS X can struggle with printer share names containing spaces. If there are problems try a share name without spaces.Select the Print Model to install and configure drivers.
Click the button.
Test print and ensure jobs are logged in PaperCut MF under the user's network identity.
Tip
Some OS X systems (depending on release and patch level) may display an authentication dialog when
printing. The results of this dialog are ignored, because the credentials are already defined in
the device URI. Administrators with knowledge of UNIX configuration file management may suppress
this dialog by editing the CUPS /etc/cups/printers.conf file by removing the
AuthInfoRequired directive under the Printer entry.
To install the PaperCut MF client software:
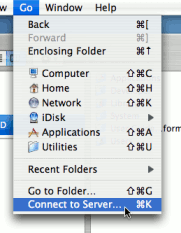
Open the Finder and select Go -> Connect to Server....
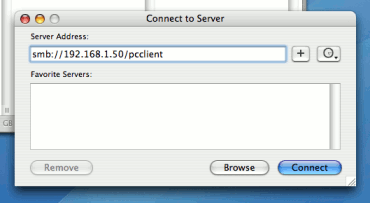
Enter
smb://servername/pcclientwhereservernameis the name of the server hosting PaperCut MF.Drag the
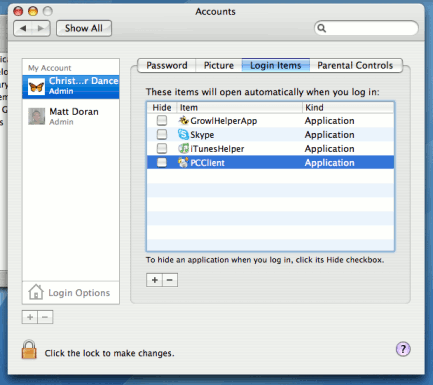
PCClientapplication across to the local Applications directory.Open System Preferences... from the Apple menu.
Select Accounts.
Click the Login items tab.
Click the button and select the newly installed
PCClientapplication.Restart the system and ensure the client starts upon login.
Schools and universities often have Macs available for student use in dedicated computer labs. In these environments the Macs are shared by many users and Scenario One is not appropriate. Larger Mac networks already using LDAP or Active Directory authentication, or planning on doing so, may wish to consider Scenario Three explained in the next section.
Scenario Two uses a popup authentication model. This is discussed in detail in the section called “Popup Authentication” and discussed further below:
The end-user's perspective:
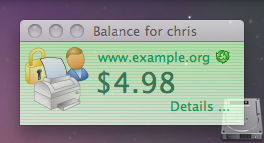
The user sees the client tool (PCClient) running.
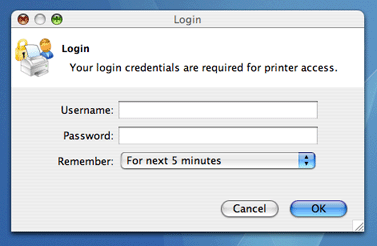
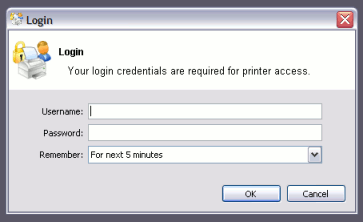
When the user prints a job, the client pops up a window requesting the user to enter a username and password. See the section called “Popup Authentication”.
The user enters a domain username and password.
If the credentials are valid, the job is charged to the user account.
The explanation:
The print event is performed as a generic user - for example "
macuser", "student", etc.In PaperCut MF, the "macuser" account is set up to use popup authentication by enabling the option Unauthenticated user. See the section called “Popup Authentication” for further details.
The popup requests the user to enter a username and password.
The password is authenticated and printing is charged against the supplied account.
Printers hosted and shared off a Windows, Mac or Linux server.
Mac systems set up to login under a generic account name. (e.g. macuser, student, etc.)
The domain contains a user account matching the generic account.
Domain account set up:
Log onto the print server or the domain controller.
Open Active Directory Users and Computers (or equivalent user management tool) from Start -> Administrative Tools.
Add a new domain user called
macuser.Define a password for
macuserand set the password to never expire.
Mac account set up:
Start up the Mac and ensure the system is connected to the network.
From the Apple menu select System Preferences...
Select Accounts.
Create an account called
macuser. Ensure the account's short name ismacuser.Set this account as the automatic login account, or alternatively make the password known to all users.
Set up the printers that the user requires access to:
Open the Printer Setup Utility from Applications -> Utilities.
Click the button to add a new printer.
Option-Click (Important: Hold the Option key down).
10.6 & 10.5: Control-Click on the Toolbar and select . Drag the icon onto the bar. Click the newly added button.
10.4: Option-Click (important: hold the Option key down) and select Advanced from the top drop-down list.
Select the Windows device type (called Windows Printing via Samba on 10.4).
In Name field, enter a friendly and informative printer name.
Enter a Device URL in the form:
smb://macuser:password@server_name/printer_nameWhere
passwordis the password for themacuserdomain account,server_nameis the name of the server hosting the printer, andprinter_nameis the printer's share name. On recent fully patched versions of 10.6 and 10.5, theusername:password@component can be skipped as the OS will instead prompt the user for their username and password on first print.Select the Print Model to install and configure drivers.
Click the button.
Test print and ensure jobs are listing in the print queue under the
macuseridentity.
To install the PaperCut MF client software:
Start and Log into the Mac computer. Ensure it's connected to the network.
Open the Finder.
From the Go menu, select Connect to Server...
Enter the pcclient share's connection details like:
smb://server_name/pcclientWhere
server_nameis the name of the server hosting the PaperCut MF server software.Enter password information if requested.
Drag the
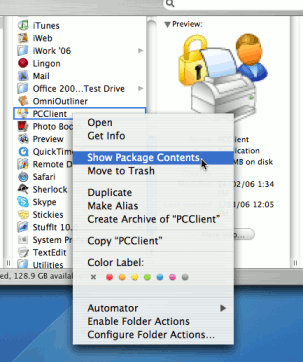
PCClientpackage over to the local hard disk's global Applications folder. The copy process will commence.Command-click on the newly copied
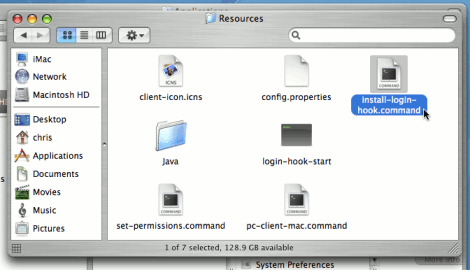
PCClientapplication in the Applications directory. Select Open Package Contents.Navigate to
Contents/Resources/.Double-click on the
install-login-hook.commandscript.Restart the system and verify the client starts on login.
Configure the popup settings:
Log on to PaperCut MF's administration interface as built-in
adminuser.Select the
macuseraccount from Users.On the
macuser's details screen, set the account balance to zero.Ensure the user is set to Restricted.
Check the Unauthenticated option and save the changes.
Click the button to save the changes.
Testing:
Log on to a Mac. Verify that the
PCClientprogram starts automatically.Print to the newly set up printer. On the server's print queue the job appears under the user identity of
macuser.The popup should display on the Mac. Enter a valid domain username and password.
The corresponding user should be charged for the job.
Larger networks often run the Macs in a domain environment either authenticating with an Active Directory or an LDAP network. In an authenticated domain environment, the identity of the user (the user's username) is known and verified at the time of login. With the help of the TCP/IP Printing Services for Microsoft Windows, and the LPR/LPD support on the Mac, print jobs can be identified on the server and associated with the user's login name. This avoids the need for the popup authentication used in Scenario Two.
Macs set up in multi-user mode authenticating off a domain. Either Active Directory or LDAP.
Printers hosted on a Windows print server.
The server needs the TCP Printing Services installed (also known as Print Services for Unix).
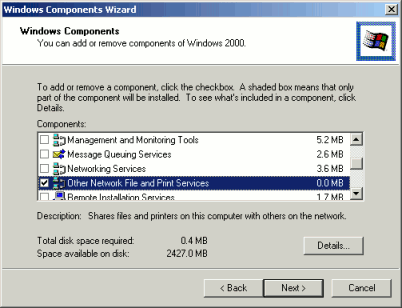
On the server hosting the printers, setup TCP/IP Printing:
Log into the server as a system
administrator.Select → .
Click on .
Select Other Network File and Print Services
Click and ensure Print Services for Unix is selected.
Click to complete the installation.
Tip
Some systems running firewall software may block LPD printing. On systems running firewall software, ensure that incoming connections from the local network are allowed on port 515.
On each Mac, add the required printers:
Open the Printer Setup Utility from Applications -> Utilities.
Click the button to add a new printer.
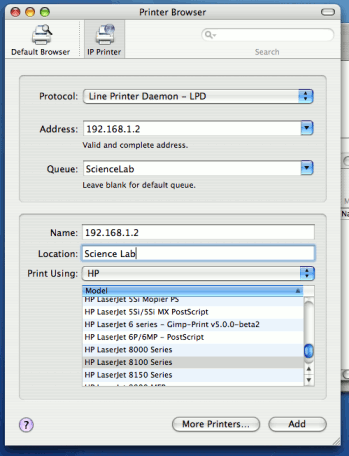
Click the button at the top toolbar.
From the Protocol dropdown, select Line Printer Daemon - LPD.
Enter the IP address of the server hosting the printers in the Address field.
Enter the printer's share name in the Queue field.
Define a user friendly name in the Name field and select the printer type.
Click the button.
Repeat for other printers as necessary.
To install the PaperCut MF client software:
Open the Finder.
From the Go menu, select Connect to Server...
Enter the pcclient share's connection details like:
smb://server_name/pcclientWhere
server_nameis the name of the server hosting the PaperCut MF server software.Enter password information if requested.
Drag the
PCClientpackage over to the local hard disk's global Applications folder. The copy process will commence.Control-click on the newly copied
PCClientapplication in the Applications directory. Select Show Package Contents.Browse to
Contents/Resources/.Double-click on the
install-login-hook.commandscript.Restart the system and verify the client starts on login.
Testing:
Restart the system and ensure the client starts on login and lists the user's account balance.
Ensure print jobs correctly account under the user's PaperCut MF account.
If the printers used by Mac clients are hosted/shared from a Mac server system (or Mac workstation system acting as a server), then the preferred solution is to install PaperCut MF's Mac server software. The Mac server may either be set up as the primary server or as a secondary server reporting back to an existing primary server.
The Macintosh server support and initial setup is documented in the section called “Installation on Apple Mac”.
The client install process is also covered in the section called “User Client”. After the first Mac is set up and the printing process is tested, the simplified client install notes covered in the section called “Deployment on Mac OS X” may be appropriate to provider to end-users or other system administrators.
The Mac client makes use of Java. Users running Mac OS X 10.4 are advised to install Java 5.0. Java 5.0 is
installed by default on Mac OS X 10.4.5 and higher. Java 5.0 for earlier Mac OS versions is available
as a dmg from the Apple website. Java 5.0 contains new features that allow the client
to display popups in an always-on-top mode above all other application windows.
Mac client can accept command line options as explained at Table A.2, “User Client command-line options”. If the client is started via the login hook, the command-line options can be defined in the file:
/Applications/PCClient.app/Contents/Resources/login-hook-start
Look for the line starting with client_args and the associated comments above.
