This quick start guide covers the initial installation and configuration of PaperCut NG in your network environment. Initial installation takes only a few minutes on a currently configured server. This guide will walk you through installation and configuration step-by-step over two phases. The process is summarized below:
System requirements check
Downloading and installing PaperCut NG
Completing the configuration wizard
Testing client software
Testing printing and remote access
PaperCut NG is a cross-platform solution and the installation procedure will vary depending on the target operating system. Please jump to the appropriate section below:
For additional information on setting up the optional Internet Control module see Chapter 13, Net Control in Detail.
Important
This guide assumes that you are using Windows Server 2003. The process is similar for other Windows operating systems. Separate documentation exists for Linux (see the section called “Installation on Linux”) and Mac (see the section called “Installation on Apple Mac”).
If you're upgrading from a previous PaperCut NG version, please refer to the directions outlined in Appendix F, Upgrading From a Previous Version.
Before installing PaperCut NG for either evaluation or production use, the system administrator should take a few minutes to verify system requirements.
Is the operating system version supported and patches up-to-date? Take a few minutes to verify the system is current and supported (see the section called “System Requirements”).
In workgroup environments (i.e. where no domain is present), some additional configuration may be required. For more details see Chapter 21, Running in a Workgroup Environment.
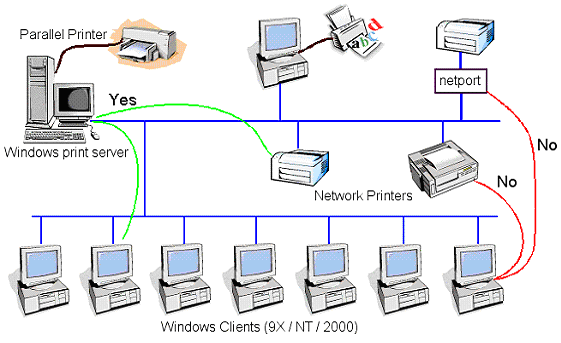
Are printer(s) installed and hosted on this system? PaperCut NG needs to be installed on the system directly hosting the printer(s). The printer should be installed as a "Local Printer" with a connection method such as TCP/IP Port, LPR, or JetDirect or directly connected to the system via USB or LPT Port.
In a multi-user environment, printers are often shared with other network users. Other workstations should
connect to these printers as "Network Printers". Ensure workstations are configured to print to the shared
print queues. For example a Windows workstation may connect to a printer via a path like:
\\[samba_server]\[printer].
Ensure that printers are configured correctly and work before installing PaperCut NG.
Important
If you are running the PaperCut NG server or clients on Windows XP (Professional or Home edition), please see Appendix B, Troubleshooting & Technical FAQ's.
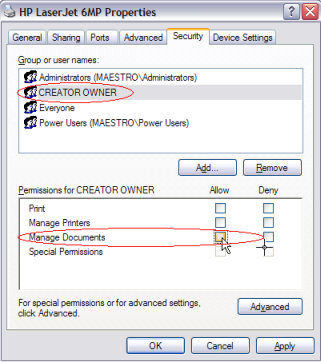
When using release stations or account selection popups it is recommended to secure the print queue so that users do not have permission to pause/resume documents in the queue. This allows PaperCut NG to have full control of documents without interference from users. To do this:
Log onto the server hosting the printers as an Administrator.
Open the printer configuration screen: →
Right-click a printer and select Properties.
Select the Security tab.
Select the CREATOR OWNER user and uncheck the Manage Documents permission. See Figure 1.6, “Configuring Windows print queue permissions”
Press the OK button.
Perform these steps for each of the monitored printers.
PaperCut NG is supplied as a standard Windows setup.exe install program.
The latest version may be downloaded from http://www.papercut.com/. After the download is complete,
run the setup wizard as an administrator level user. A system restart is usually not required but
administrators are advised to perform installation on live production systems during periods
of low activity - for example, not during backup operations or other administration activities.
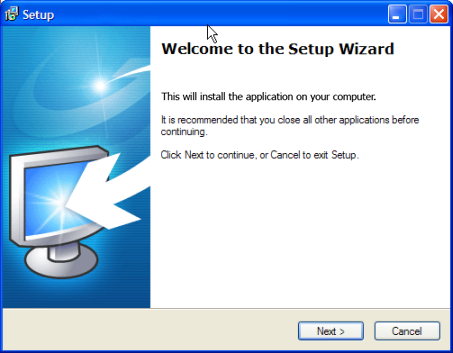
Select the "standard install" option and install PaperCut NG onto a hard drive with adequate free disk space. The default options will suffice for most systems. After the installation is complete, a web browser will open to complete final configuration. Please proceed to Phase II (the section called “Quick Start Guide - Phase II - Configuration and Testing”).
Important
This guide assumes that you are installing on a Mac OS X 10.4 (either server or workstation) hosting and sharing printers. If you're upgrading from a previous PaperCut NG version, please refer to the directions outlined in Appendix F, Upgrading From a Previous Version.
The following section assumes the reader has knowledge of general Mac OS X server management. Although the installation process is graphical, it would be an advantage to have knowledge of the command-line, creating users, editing configuration files and an understanding file permissions.
Before proceeding with the installation the system administrator should take a few moments to verify system requirements. Is the operating system version supported and are patches up-to-date? Take a few minutes to verify the system is current and supported (see the section called “System Requirements”). A system prerequisite is Java version 5.0 or higher. If Java 5 is not already installed, the installer is available from the Apple website at: http://www.apple.com/support/downloads/java2se50release3.html.
Administrators should ensure that the print queues are set up and working as expected before attempting to install PaperCut NG.
In network environment printers shared over the network in a way to allow multi-user access. Mac servers share print queues using the Internet Printing Protocol (IPP) - a service provided by CUPS. It is important that workstations/clients print to the server's shared print queues rather than directly to physical printer itself. The general procedure is to first setup and establish the printer on the nominated system (the print server which will run PaperCut NG), share the printers, then add the printers on each workstation. The standard procedure can be summarize as follows:
Install the printers on the server using the manufacturer's suggested procedure. For convenience, give the printer a simple name without spaces. Network printers connected via JetDirect (Socket) or LPD are recommended. Some printers have built-in AppleShare support. We recommend disabling this if possible and using JetDirect (Socket). Test local printing directly from the server to confirm the printer is configured correctly - e.g. print a website from Safari.
Ensure printer sharing (the Print Server) is enabled on the server/host. System administrators running firewalls should also confirm that port 631 (the standard CUPS port) is accessible from the local network. On Mac OS X Server, each print will also need IPP sharing enabled.
Add the printer(s) on the workstation(s) using the Printer Setup Utility. Select IP Printer and the Internet Printing Protocol - IPP option. Enter your server name (or the server' IP Address) in the Address field and the printer name prefixed with
printers/in the Queue field. The name of the printer will be the same as configured in step 1. For example:printers/my_office_printer.Take some time to print from the workstation and confirm that printing succeeds. You should see the job appear in the server's print queue before the job appears at the printer.

If the printers are currently not installed and configured, this task should be performed and verified before proceeding further.
PaperCut NG runs under a non-privileged user account called "papercut".
This invisible system account is created automatically upon first install. Advanced system administrators
may however have a preference to create this account manually. If you fall into this category,
create the papercut account now prior to installation.
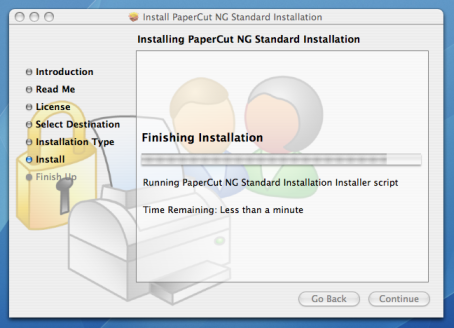
PaperCut NG is supplied as a standard disk image containing the installer. Log on as an
admin level account. Download and double-click Mac installer. Double-click on the installer
package named PaperCut NG Standard Installation.pkg. Follow the directions on the screen. The
installation process will take between two and five minutes depending on the speed of the system. A system restart
is usually not required but administrators are advised to perform installation on live production systems
during periods of low activity - for example, not during backup operations or other administration activities.
The default install location is /Applications/PaperCut NG
Important
Make sure you're installing the correct package. The similarly named
PaperCut NG Secondary Server Installation.pkg only installs part of the application
and is designed for more advanced networks.
After the installation is complete, a web browser will open to complete final configuration. Please proceed to Phase II (the section called “Quick Start Guide - Phase II - Configuration and Testing”).
Important
The following section assumes the reader has knowledge of general Unix/Linux system management including using the command-line, creating users, editing configuration files and understanding file permissions.
Before proceeding with the installation the system administrator should take a few moments to verify system requirements. Is the operating system version supported and are patches up-to-date? Take a few minutes to verify the system is current and supported (see the section called “System Requirements”).
Are printer(s) installed and hosted on this system and are they exposed to the network either via CUPS or Samba? Administrators should ensure that the print queues are set up and working as expected before attempting to install PaperCut NG.
In a multi-user environment, printers are often shared with other network users. Other workstations should
connect to these printers as "Network Printers". Ensure workstations are configured to print to the shared
print queues. For example a Windows workstation may connect to a samba exposed printer via
\\[samba_server]\[printer]. Other Linux or Mac workstations will use IPP via CUPS.
If the printers are currently not installed and configured, this task should be performed and verified before proceeding further.
PaperCut NG runs and installs under a non-privileged user account called "papercut". The installation
location for the application is the papercut user's home directory. Create a user account
on this system called papercut. This is usually done by logging in as
root and at the command prompt entering:
shell> useradd -d /home/papercut papercut
The syntax for useradd and groupadd may differ slightly on different
versions of Linux. They may also be called adduser and addgroup.
The user's home directory (the -d option) denotes the install location.
/home/papercut is the recommended location. Administrators may
however also consider alternate install locations depending on personal preference. Alternates including:
/usr/local/papercut/opt/papercut
Important
This quick start guide assumes the install location is /home/papercut.
If an alternate home location is defined, some of the paths listed in subsequent sections
will require modification.
PaperCut NG is supplied as a self-extracting and self-installing archive. The installation is done
under the rights of the newly created papercut and temporary root
access will be required. Please have the root password handy. (Administrators who are after a detailed explination
of the install process should also consult the background information in Chapter 18, PaperCut NG on Linux).
Log on as the newly created papercut user and download and execute the installer:
        shell> su - papercut
        shell> wget [download url from PaperCut Software website]
        shell> sh ./pcng-setup-linux-i686.sh
Follow the installation instructions and enter the root password when requested.
Important
Ensure you login as the user papercut
so that the user's environment is sourced so the home directory (install location)
is correctly defined.
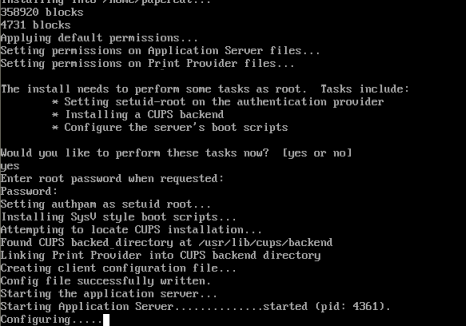
The installation process will take between two and five minutes depending on the speed of the system. A system restart is usually not required but administrators are advised to perform installation on live production systems during periods of low activity - for example, not during backup operations or other administration activities.
After the installation is complete, you will need open a web browser to complete final configuration. Please proceed to Phase II (the section called “Quick Start Guide - Phase II - Configuration and Testing”).